Wednesday, June 5, 2013

May 2013: Let's take this party outside!


We took May's Pinterest party outdoors!  We made funky pots, planted herbs, lit up words & mason jars,  & created a whimsical patio sign.  Oh, we also made our furry friends some fleece toys!

We started off this Pinterest Party with appetizers and alcohol!
For the appetizer I made Mini Crab Rangoons.  Not only were these very tasty, they were also super easy to make.  My oven actually broke while I was preparing batch #2, but as soon as I get it fixed I will definitely be making these again.  
Crab Rangoon Mix, Green Onions, Won Ton Wraps
Won Ton Wraps - Use mini muffin pan
Yum, yum!


For the drink, I made Watermelon Coolers.  Honestly, I thought these were just okay.  Nothing spectacular. We added watermelon vodka to ours because we can't have a party without alcohol.  The kids had them (without the vodka, of course) and they weren't overly thrilled either.  They didn't hate them, but they weren't fighting each other for seconds.  It might have been the texture?...


Ashlei: 
I pretty much love any craft that has Christmas lights on the materials list! I thought it would be so cool to make a light up sign like I saw here. I wanted a word that wasn't your generic "love", "hope", "happiness" you see in everyone's house. Listening to some music for inspiration, I came across the word "Reverie". Which means to daydream, or get lost in a daydream. I loved it! I bought the letters from Hobby Lobby and they were on sale so I only spent under $2 per letter. The blogger on this post said it took 10 minutes per letter so I anticipated an easy project. This was NOT the case. This project took me a few days actually!! Honestly I would not recommend this to the beginning crafter. It was VERY frustrating and difficult!! Tip: If you are determined to do this like I was; if you follow the blogger's instructions, do not cover with the tracing paper until almost last. (After you poke the lights through). I had to trace and cover the letters twice because it is too easy for the paper to get poked or ripped when making the whole thing. I was extremely satisfied once I finished the project. I chose to hot glue a few of the letters together and hang it a little crazy.


Finished product:

PIN WIN!! (But VERY difficult)!


Mollie:
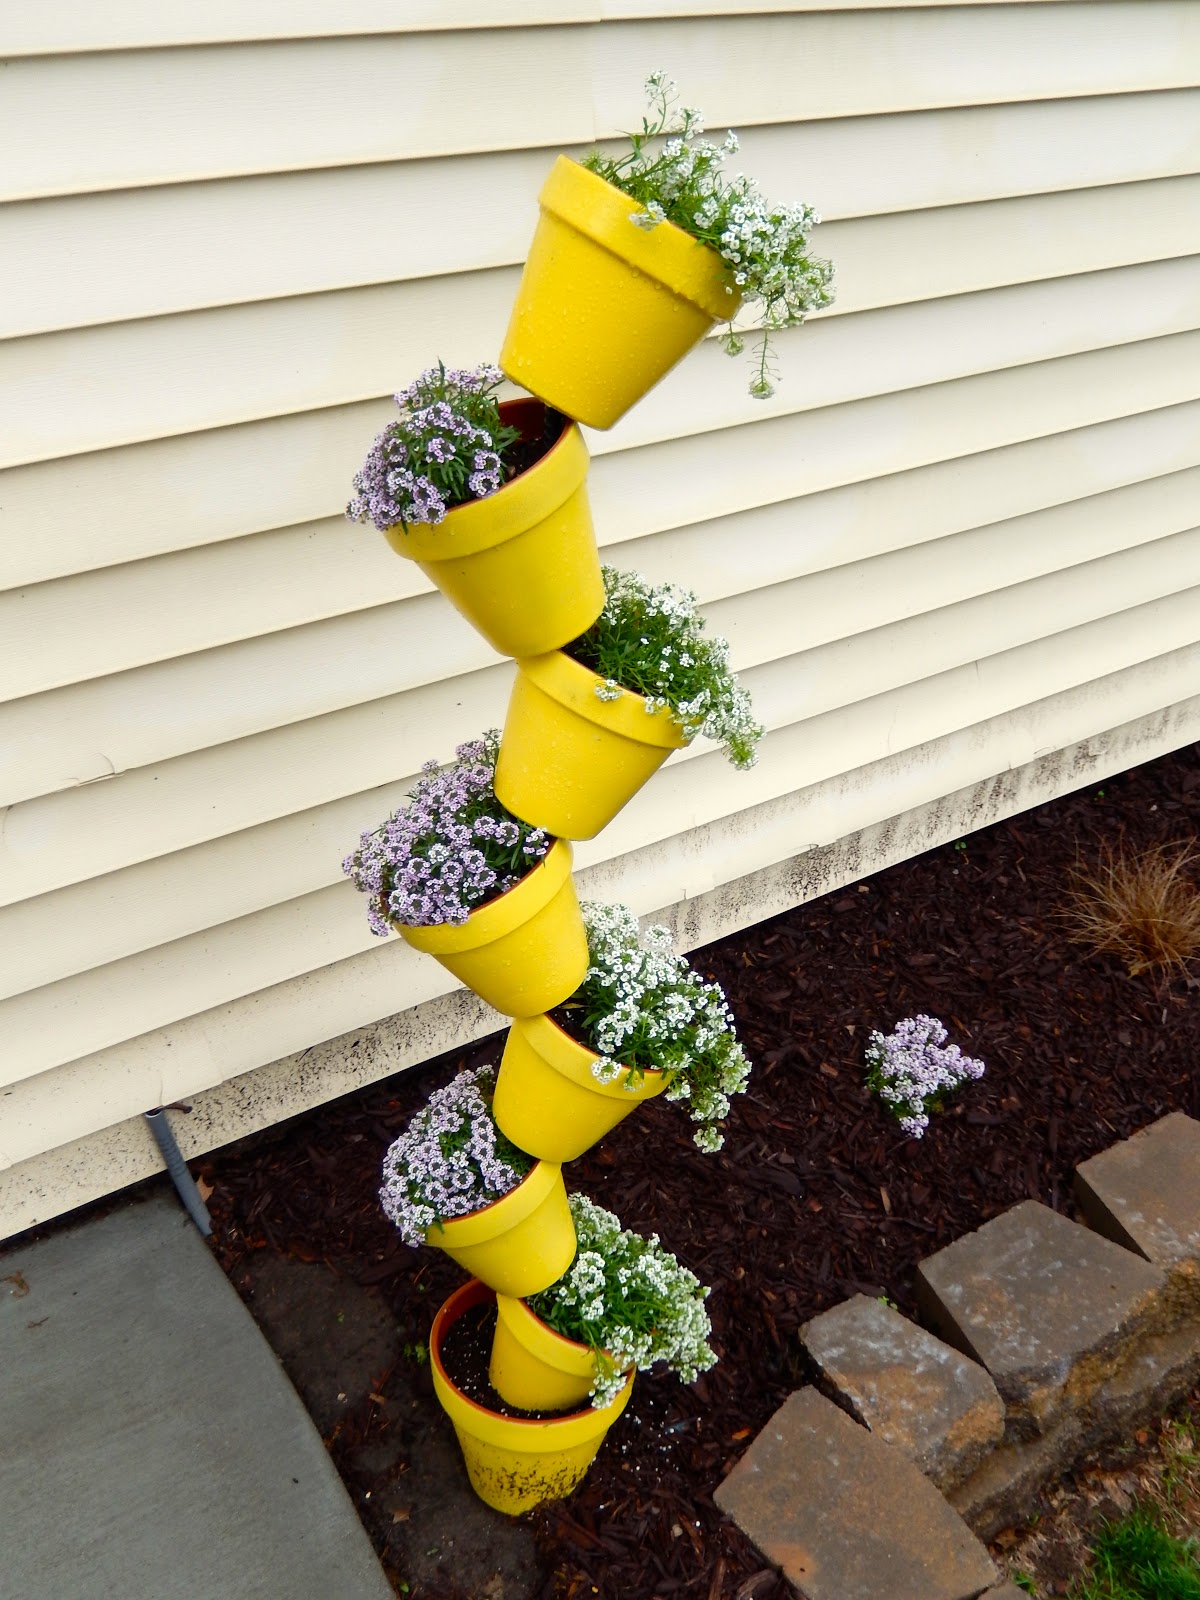
For my first project, I decided to do this Tierred Potted Plant that I've been swooning over! While it was a little time consuming, it was a lot of fun and pretty easy!  I bought paint pens to add our house number but I changed my mind after I was done. I am planning on doing a smaller version for my front steps also. You could choose virtually any color combination for this project!! I second her suggestion on starting with the top pot and working your way down when it comes time to filling them with flowers. The hardest part was picking out which flowers to fill it with!!


Overall Rating -- PIN WIN!!


For my second project, I decided to do this Rainbow Pour Painted Pot I found on Pinterest. As soon as I saw it, my heart skipped a beat because I like all things BRIGHT and COLORFUL!  This project was a little pricey due to all the paint I had to buy, however, if you already have a bunch of colors it wouldn't be too bad.  If you don't dig the rainbow colors like me, try it in any color you'd like! I decided to spray paint my pot white so it would show through the paint rather than the terracotta color.  Mine didn't turn out exactly like the post I followed but I think more paint would take care of that.  She used a 6" terra cotta pot but I used a bigger one...she also used 8 oz bottles of paint and I used smaller ones...which might have been my problem but I was being a cheapskate when I bought all my paint! I would love to try this with a smaller pot and give out as gifts!!   My only tip on this project would be to follow her directions if you like her look!!


My little helpers!!


The finished product!  My mother in law recently passed away and she had this angel out in her front yard. Unfortunately, she never got to put a pot in it so I decided to honor her memory by finishing what she started! She loved roses so I planted moss roses in the pot. I think she'd love the way it turned out!

Overall rating -- PIN WIN!!


Danielle:  
So, I made some fleece pet toys using these instructions .  They were very easy.  I have two tips for this project:
1.  Use yarn instead of string to tie up the fabric.  I found that the string was hard to tie up and didn't tighten as well as I wanted.  
2.  Use longer strips of fabric for dogs to play tug-of-war.  They don't pouf up as well though. Use shorter strips for a poufier, cuter ball.  


I made some mason jar lights for outside.  They were super easy and I little messy because of the mod podge.  I used this pinterest post.  I added flamless candles and used silly putty to adhere them to the top of the lid (inside the jar).  They don't put off much light but they would look really cool strung together on a fence line.  Or maybe a whole bunch of them lit up all around your patio area.


My final project was my very first herb garden.  I got my inspiration from this pin. I wish I had time to head to the antique store to buy some vintage tins but these turned out pretty good.  I've made salsa and caprese salad from my lovely new herb garden.
PIN WIN!


Lindsay:  
I decided to make an indoor herb garden.  Herbs can be expensive in the store so I liked the idea of having my own little garden.  The herbs I chose to plant are parsley, chives & cilantro, which I planted in mason jars.  They are sitting in my kitchen on my window sill.  They are growing & taste delicious.  You can also freeze the herbs in some olive oil and use when cooking later.  

Lindsay's Herb Garden
PIN WIN!

My husband & I have been updating our patio over the past year so I decided it would be fun to make a sign to put out there.  We had some old pallets that we cut up and the sign is made from the pallet boards.  I spray painted the boards and then free-handed the writing.  I wanted it to look imperfect and whimsical.  I think it adds a nice touch & cost next to nothing to make.

Patio Sign
PIN WIN!


Monday, May 27, 2013

The Great Outdoors

It's that time of year again when we are all planting flowers and making our yards look beautiful.  I found some inspiration for a flower pot tower on Pinterest.  It turned out great & is a great addition on my patio.


Items Needed:
7 6 inch clay pots
1 8 inch clay pot (this is the base for the tower)
6 foot of rebar
Plants
Spray paint
Potting Soil

Directions:
1) Pound the rebar into the ground.  I would then stack the pots to see if the rebar is as tall as you need it.
2) Spray paint the clay pots
3) Once pots are dry, place 8 inch pot through the rebar & fill with potting soil.  This will be the base of the tower.
4) Take a 6 inch pot and put it through the rebar and tilt to one side.  Fill with potting soil.
5) Continue to stack the remaining pots and fill each with soil.
6) Plant the flowers in the pots.


PIN WIN!!!

Monday, May 20, 2013

Dog Treats

My dogs LOVE treats & I LOVE to give them out!  Here's the recipe for my favorite homemade treat:


FROZEN DOG TREATS

Ingredients:
32oz. plain yogurt
3/4 cup peanut butter
1 TBS honey
1 banana
3 oz. Dixie Cups 
Medium Milkbones 
Whipped Cream (optional)


  • Mix top four ingredients.  
  • Optional Step:  I like to add whipped cream to the bottom of the cups to prevent the treat from sticking to the bottom.  For some reason, it doesn't stick to the sides of the cup...  By coating the bottom of the cup with a small dab of cream, you can easily peel back the entire cup from the treat once they are frozen.  
  • Spoon mixture into Dixie cups.  If you have a smaller dog, I would recommend filling them 1/2 full and using smaller milkbones.
  • Place milkbone in the middle.  
  • Freeze.
  • Enjoy!

Saturday, May 4, 2013

Another Wine Cork Project

Inspired by Danielle's recent wine cork project, I decided to make one also for my mother-in-law's birthday.  I bought the letters and wood plaque at Hobby Lobby.

Finished project
 
Supplies
Instructions:
1) Glue wine corks on the letters.
2) Spray paint wood plaque whatever color you choose.
3) Glue letters onto wood plaque once paint is dry.
4) Add hardware to the back so you can hang it up.

OVERALL RATING:  PIN WIN!


Burlap Wreath

At our second Pinterest party Mollie made a burlap wreath.  I loved it and have been wanting to make one ever since, so last night I decided to finally make one.  I attached it to a window I had bought at Target awhile ago and hung it in my dining room.  The window had been sitting in my spare room for a long time, and recently I saw a picture of a wreath hanging on an old window & I loved it.

Burlap Wreath

Hanging in my dining room

All you need to make the wreath is a round wire wreath and burlap rolls.  This size of wreath used 2 rolls of the Chevron burlap ribbon.  Getting started on this wreath is the hardest part.  I weaved in and out of each wrung and did this three times on each section.  That made the wreath full and all the wire parts of the base are covered.  Pull extra ribbon through to make sure that it's full.  I hope you like it!

OVERALL RATING:  PIN WIN!


Wednesday, May 1, 2013

Glitter quote on canvas

I had so much fun doing the quote on canvas we did at our first Pinterest party, I wanted to do another to put in my kitchen. I had a small canvas, found a quote I liked, and decoupaged magazine pictures on it. After I added my quote in small letters, and painted, I peeled them up to find the smaller the letters are, the harder it is for the paint to not run through. After some trial and error and trying to do this thing TWICE, I turned to my favorite crafting material - GLITTER! I just used some Elmers glue and a toothpick to fill in where the letters where and sprinkled the glitter on. I even made a border the same way.
TADA!

Art with Crayons!

This was one of my first Pinterest projects, just haven't posted until now! I did my own take on using crayons through a hot glue gun. First I painted the entire thing black. (I was re-using a canvas). This is a great project for reusing canvases you might have tried to glue something to or tried something and it didn't work out. Next I used painters tape to make the outline of a heart but left one side a little open and scraggly. Then I peeled the paper off the crayons (works best if you use an Exact-O knife and just slit down one side. Come off super easy and you don't get crayon under your nails! Then I just went to town! Basically I liked the spotting effect but then found if it spurted out a lot of melted crayon it looked cool to tilt the canvas and make it run down. At the end, I removed the tape and used black crayon to fill in where that was. Here is the finished piece:


Some more tips:
*The glue gun may get VERY hot doing this project. Mine actually blew my outlet! Was it worth it? YES! It could be the older apartment I live in, as I've never had problems using a glue gun on projects before, but you might want to switch outlets halfway through or unplug it and give it some time to cool off.
*Use a pen to push crayons through if you need to, but also let them sit and warm up enough to melt while you are crafting this.
*Some posts on Pinterest say you can't use your glue gun again after this project. You definitely can - it DOES NOT ruin it! I would suggest inserting a glue stick after you are done to "clean it out" and then when it's not hot just scrape off the dried crayon.